
As part of my apprenticeship, I have to gain a vendor qualification. The one I am doing is the Microsoft 70-480 exam, Programming in HTML 5 with JavaScript and CSS.

Unfortunately I have almost 0 experience in all the areas of the exam, so I have been doing lots of revision. I wanted to share my notes in the hope that they may be helpful to others. The notes are from me attempting mock exams, and then researching what I got wrong.
There are 3 main parts to the exam; HTML, CSS and JavaScript. I will separate my notes into those 3 sections.
This is not meant to be a complete guide to the exam, this is just my notes on areas where I got stuck! There is much, much (much) more to learn.
Update
I passed my exam, with a mark of 80%! 🎉
HTML
WebSockets allow us to make “socket” connections between a web browser and a server. This means there is a persistent connection between the client and the server and both parties can start sending data at any time.
You open up a WebSocket connection simply by calling the WebSocket constructor:
var connection = new WebSocket('ws://html5rocks.websocket.org/echo', ['soap', 'xmpp']);
Notice the ws:. This is the new URL schema for WebSocket connections. There is also wss: for secure WebSocket connection the same way https: is used for secure HTTP connections.
Some useful methods:
// When the connection is open, send some data to the server
connection.onopen = function () {
  connection.send('Ping'); // Send the message 'Ping' to the server
};

// Log errors
connection.onerror = function (error) {
  console.log('WebSocket Error ' + error);
};

// Log messages from the server
connection.onmessage = function (e) {
  console.log('Server: ' + e.data);
};
As soon as we have a connection to the server (when the onopen event is fired) we can start sending data to the server using the send() method. It used to support only strings, but in the latest spec it now can send binary messages too. To send binary data, you can use either Blob or ArrayBuffer objects.
// Sending String
connection.send('your message');

// Sending canvas ImageData as ArrayBuffer
var img = canvas_context.getImageData(0, 0, 400, 320);
var binary = new Uint8Array(img.data.length);
for (var i = 0; i < img.data.length; i++) {
  binary[i] = img.data[i];
}
connection.send(binary.buffer);

// Sending file as Blob
var file = document.querySelector('input[type="file"]').files[0];
connection.send(file);
Web Workers let us run background scripts in web applications. Web Workers allow you to do things like fire up long-running scripts to handle intense tasks, but without blocking the UI or other scripts to handle user interactions.
Web Workers run in an isolated thread. As a result, the code that they execute needs to be contained in a separate file. When we create a new Worker object in the main page, the constructor takes the file name of the worker script:
var worker = new Worker('task.js');
If the specified file exists, the browser will spawn a new worker thread, which is downloaded asynchronously. The worker will not begin until the file has completely downloaded and executed. If the path to your worker returns a 404, the worker will fail silently.
After creating the worker, start it by calling the postMessage() method:
worker.postMessage(); // Start the worker.
Due to their multi-threaded behaviour, web workers only have access to a subset of JavaScript’s features:
- The navigator object
- The location object (read-only)
- XMLHttpRequest
- setTimeout()/clearTimeout() and setInterval()/clearInterval()
- The Application Cache
- Importing external scripts using the importScripts() method
- Spawning other web workers
Workers do NOT have access to:
- The DOM (it’s not thread-safe)
- The window object
- The document object
- The parent object
- Global variables of the main page
The Worker has a property named self that references the scope of the Worker object.
To communicate between the main page and the worker, you pass messages between the two. To establish two-way communication, you would use the onmessage event handler of both the main page and the web worker to capture events coming from the other.
Handling a Message to a Web Worker
You need to write code to handle a message sent to your Web Worker. Example:
A web page contains the following code to obtain information about a phone number:
var service = new Worker("PhoneNumberLookup.js);service.postMessage({"areaCode":"107", "prefix": "311", "number": "9876"});
You need to write code in PhoneNumberLookup.js to retrieve the area code from the sent message.
onmessage = function(e) {
  var areaCode = e.data.areaCode;
}
This code uses an anonymous function to handle the onmessage event. The paramenter, e, given to the anonymous function is an event object. This object has a data property which contains the data sent as a parameter in the postmessage() method. The data can either be a string or JSON.
HTML 5 Animation
#demo {
  animation: frames 5s infinite
}
frames is the name of the animation. 5s is the duration in seconds. infinite tells it to loop forever.
@keyframes frames {
  from {
    background-color: red;
    width: 200px;
  }

  to {
    background-color: yellow;
    width: 400px
  }
}
When you specify CSS styles inside the @keyframes rule, the animation will gradually change from the current style to the new style according to the rules set (in this case over 5 seconds).
To get an animation to work, you must bind the animation to an element, in our case frames.
HTML 5 Multiple Columns
column-count and columns
The column-count and columns properties work in the same way. They both break an element’s content into the specified number of columns.
HTML 5 Search Engine Optimisation
Use the meta tag to add things to page which aren’t visible, but appear in Google Searches.
HTML 5 Form Function on Submit
onsubmit or Submit Button onclick, you can return a function. This lets the form use the result of the function. The function has to return something for this to work.
<form onsubmit="return something()">
// rest of form
</form>

function something() {
  return true;
}
HTML 5 DOM Event Handler
In a DOM event handler, the this keyword refers to the element that fired the event.
DOM Object Return Value
DOM objects have a returnValue property that you can set to control the default behaviour of an element when the event is raised. When set to true, you indicate that the default behaviour should occur, when set to false you indicate that it shouldn’t.
Bubbling and Capturing
Event bubbling and capturing are two ways of event propagation in the HTML DOM API, when an event occurs in an element inside another element, and both elements have registered a handle for that event. The event propagation mode determines in which order the elements receive the event.
With bubbling, the event is first captured and handled by the innermost element and then propagated to outer elements.
With capturing, the event is first captured by the outermost element and propagated to the inner elements.
Capturing is also called “trickling”, which helps remember the propagation order:
trickle down, bubble up
Example Code:
<div id="div1">
  Outer div
  <div id="div2">
    Inner div
  </div>
</div>

<script>
  function capture(e) {
    alert("Capture at " + this.id);
  }

  function bubble(e) {
    alert("Bubble at " + this.id);
  }

  var div1 = document.getElementById("div1")
  var div2 = document.getElementById("div2")

  // add code here

</script>
We want to add code to get it to print the following when clicked:
Capture at div1
Capture at div2
Bubble at div2
Bubble at div1
Answer:
div1.addEventListener("click", capture, true);
div2.addEventListener("click", capture, true);
div1.addEventListener("click", bubble, false);
div2.addEventListener("click", bubble, false);
This works because addEventListener accepts three parameters:addEventListener(type, listener, useCapture)
The first parameter is the event type to register, the second is the event handler function to handle the event. The third specifies whether or not to use capturing (outer to inner) or to use bubbling (inner to outer).
The HTML <hgroup> element represents a multi-level heading for a section of a document. It groups a set of <h1>–<h6> elements.
HTML 5 Canvas
To manipulate an HTML 5 canvas, you must first get its 2D context.
var ctx = canvas.getContext("2d");
To fill the background with a colour, you should specify the fillStyle property.
ctx.fillStyle = "orange";
Then use the fillRect(x, y, width, height) property to fill a rectangle from top left to bottom right.
ctx.fillRect(0, 0, 200, 200)
fillRect comes after fillStyle, because you need to specify the fill colour before actually doing the fill.
<a href=”https://www.w3schools.com/tags/att_input_step.asp” target=”_blank” rel=”noreferrer noopener” aria-label=”<input> step Attribute
The step attribute specifies the interval between legal numbers in an element.
The step attribute can be used together with the max and min attributes to create a range of legal values.
For example:
<input type="number" min="0" max="10" step="3" />
Would only allow the values 0, 3, 6 and 9.
The step attribute works with the following input types: number, range, date, datetime, datetime-local, month, time and week.
HTML 5 Subheading Structure
Usually to create headers of different sizes you would use h1 to h6.
However you could use the following to create a subheading structure in HTML 5 instead:
<h1>Heading<h1>
<section><h1>Subheading 1</h1></section>
<section><h1>Subheading 2</h1></section>
Putting headings inside the <section> tag reduces their size, so there is no need to use h2 in this case.
HTML 5 Focus Events
onBlur – occurs when element loses focusonFocus – occurs when the element gets focusmouseOut – occurs when the mouse pointer leaves any child elements as well the selected element.mouseLeave – occurs when the mouse pointer leaves the selected element.mouseOver – occurs when the mouse pointer enters the div element, and its child elements.mouseEnter – occurs when the mouse pointer enters the div element.
See here for demonstrations on the differences between mouseOut and mouseLeave, and mouseOver and mouseEnter
HTML 5 Non-Visible Elements
visibility:hidden – can’t be seen, but takes up spacedisplay:none – can’t be seen, takes up no space
<a href=”https://www.w3schools.com/html/html_form_input_types.asp” target=”_blank” rel=”noreferrer noopener” aria-label=”HTML 5 HTML 5 <input> Types
I find it hard to remember all the different input types that are possible, and what they do, so here is the full list.
<input type="button"> – defines a button<input type="checkbox"> – defines a checkbox<input type="color"> – used for input fields that should contain a color. Depending on browser support, a colour picker may appear.<input type="date"> – used for input fields that should contain a date<input type="datetime-local"> – specifies a date and time input field, with no time zone<input type="email"> – used for input fields that should contain an e-mail address<input type="file"> – defines a file-select field and a “Browse” button for file uploads<input type="hidden"> – defines a hidden input field<input type="image"> – defines an image as a submit button<input type="month"> – allows the user to select a month and year<input type="number"> – defines a numeric input field<input type="password"> – defines a password field<input type="radio"> – defines a radio button<input type="range"> – defines a control for entering a number whose exact value is not important (like a slider control)<input type="reset"> – defines a reset button that will reset all form values to their default values<input type="search"> – used for search fields<input type="submit"> – defines a button for submitting form data to a form-handler<input type="tel"> – used for input fields that should contain a telephone number<input type="text"> – defines a one-line text input field<input type="time"> – allows the user to select a time (no time zone)<input type="url"> – used for input fields that should contain a URL address<input type="week"> – allows the user to select a week and year
JavaScript
Regex in JavaScript
Define regex pattern first, then use the test() method, passing in string you want to test:
var regex =  /^[a-zA-Z0-9_-]{8,16}$/;

regex.test(string)
This particular regex pattern will match a string with either letters or numbers that is between 8 and 16 characters long.
JSON.stringify turns a JavaScript object into JSON text and stores that JSON text in a string, eg:
var my_object = { key_1: "some text", key_2: true, key_3: 5 };

var object_as_string = JSON.stringify(my_object);
// "{"key_1":"some text","key_2":true,"key_3":5}"

typeof(object_as_string);
// "string"
JSON.parse turns a string of JSON text into a JavaScript object, eg:
var object_as_string_as_object = JSON.parse(object_as_string);
// {key_1: "some text", key_2: true, key_3: 5}

typeof(object_as_string_as_object);
// "object"
Alternatively use jQuery.parseJSON
Ajax is an acronym for Asynchronous Javascript and XML. It is used to communicate with the server without refreshing the web page and thus improving the user experience.
The jQuery $.ajax() function is used to perform an asynchronous HTTP request. The signatures for an ajax request would be:
$.ajax(url, [options])
$.ajax([options])
Here is an example:
$.ajax({
  url: 'http://api.joind.in/v2.1/talks/10889',
  data: {
    format: 'json'
  },
  error: function() {
    $('#info').html('<p>An error has occurred</p>');
  },
  dataType: 'jsonp',
  success: function(data) {
    var $title = $('<h1>').text(data.talks[0].talk_title);
    var $description = $('<p>').text(data.talks[0].talk_description);
    $('#info')
      .append($title)
      .append($description);
  },
  type: 'GET'
});
To break it down, the first parameter:
url: 'http://api.joind.in/v2.1/talks/10889',
Tells ajax where to go for the request.
The second parameter:
data: {
  format: 'json'
},
Is data to be sent to the server. It is converted to a query string, if not already a string. It’s appended to the url for GET-requests.
The third parameter:
error: function() {
  $('#info').html('<p>An error has occurred</p>');
},
Tells ajax what to do if there is an error. In this case it is using jQuery’s CSS Selector to add some html code to the block with id info.
The fourth parameter:
dataType: 'jsonp',
Just tells ajax that the data will be json. dataType: jsonp is for cross-domain request, that means request to different domain and dataType: json for same domain, same origin requests.
The fifth parameter:
success: function(data) {
  var $title = $('<h1>').text(data.talks[0].talk_title);
  var $description = $('<p>').text(data.talks[0].talk_description);
  $('#info')
    .append($title)
    .append($description);
},
Tells ajax what to do if the request is successful. In this case it is creating two variables, $title and $description, and it is taking data from the response and saving them into these variables. These variables are then appended to the block with id info.
Finally the last parameter is:
type: 'GET'
Which lets ajax know the request type.
All the parameters can be found here.
jQuery Serialize
Usually used on a form.
<form>
  <div><input type="text" name="a" value="1" id="a"></div>
  <div><input type="text" name="b" value="2" id="b"></div>
</form>
The .serializeArray() method creates a JavaScript array of objects, ready to be encoded as a JSON string. It operates on a jQuery collection of forms and/or form controls.
$( "form" ).serializeArray();
Result:
[
  {
    "name": "a",
    "value": "1"
  },
  {
    "name": "b",
    "value": "2"
  }
]
The .serialize() method creates a text string in standard URL-encoded notation.
$( "form" ).serialize();
Result:
a=1&b=2
jQuery Find Elements of Type
For example, we have:
<input type="button"/>
<button/>
To select both with jQuery, use the below.$(":button")
To change the css for both:$(":button").css("background-color", "blue");
XMLHttpRequest
Use XMLHttpRequest (XHR) objects to interact with servers. You can retrieve data from a URL without having to do a full page refresh. This enables a Web page to update just part of a page without disrupting what the user is doing. XMLHttpRequest is used heavily in AJAX programming.
XMLHttpRequest POST
You are developing a web page that allows users to submit data. You want to generate the following HTTP request:
POST /Feedback.asp HTTP/1.1
Host: www.measureup.com
Content-Type: application/x-www-form-urlencoded
FirstName=Jamie&LastName=Smith
You need to write code to accomplish this:
var request = new XMLHttpRequest();
request.open("POST", "www.measureup.com/Feedback.asp", false)
request.setRequestHeader("Content-type", "application/x-www-form-urlencoded");
request.send("FirstName=Jamie&LastName=Smith");
This uses the XMLHttpRequest object to post data to a page named Feedback.asp. It calls the open method, passing it the HTTP request type, the url, and a boolean value specifying the request is async or not. It calls setRequestHeader to set the content type of the request body. Finally it calls the send method to send the request, passing the data to post.
XML Document
Example, we use XHR to retrieve an XML document as an IXMLDOMDocument object, which is saved to a variable named doc. The XML document represents a restaurant menu which has the following structure:
<Menu>
<Item Name="Soup" Price="5.99" Calories="600" Type="Food" />
<Item Name="Sandwich" Price="8.99" Calories="500" Type="Food" />
<Item Name="Lemonade" Price="1.99" Calories="100" Type="Drink" />
</Menu>
You need to use the IXMLDOMDocument object to find the price of a sandwich and lemonade. Here is how you do this:
var totalPrice = 0
var prices =
doc.selectNodes("//Item[@Name='Sandwich' or @Name='Lemonade']/@Price");
for (var index = 0; index < prices.length; index++) {
  totalPrice += prices[index].value;
}
This code calls the selectNodes method, passing it to an XPATH expression that return all Price attributes where the Name is equal to Sandwich or Lemonade. It then iterates through the returned attributes and adds their values.
selectNodes always takes an XPath Expression.
XPath uses path expressions to select nodes or node-sets in an XML document. The node is selected by following a path or steps.
See the link above for useful examples.
Use xhr.upload.onprogress to get values for a progress bar when using XHR.
xhr.upload.onprogress = function(evt)
{
    if (evt.lengthComputable)
    {
        var percentComplete = parseInt((evt.loaded / evt.total) * 100);
        console.log("Upload: " + percentComplete + "% complete")
    }
};
switch Statement
The syntax of the switch statement is as follows:
switch (expression) {
  case label1:
    //do something
    break;
  case label2:
    //do something
    break;
  default:
    //do something
}
In a switch statement, execution starts from the matching case label and will continue until it encounters a break or the end of a switch statement. The break is necessary if you want to terminate after a case block. default will be executed if the switch expression matched none of the case blocks.
With jQuery, you can hide and show HTML elements with the hide() and show() methods.
$("#hide").click(function(){
  $("p").hide();
});

$("#show").click(function(){
  $("p").show();
});
hide() and show() also accept a time parameter in ms to determnine how quickly to show/hide the element.
toggle() can also be used to flip between show and hide.
Use this code to play around with it:
<html>
<head>
<script src="https://ajax.googleapis.com/ajax/libs/jquery/3.4.1/jquery.min.js"></script>
<script>
$(document).ready(function(){
  $("#hide").click(function(){
    $("p").hide(1000);
  });
  $("#show").click(function(){
    $("p").show(1000);
  });
  $("button").click(function(){
    $("p").toggle(1000);
  });
});
</script>
</head>
<body>

<button id="hide">Hide</button>
<button id="show">Show</button>
<button id="toggle">Toggle</button>

<p>This is a paragraph with little content.</p>
<p>This is another small paragraph.</p>

</body>
</html>
Define JavaScript Object with Properties
Example:
You need to initialize an object with two properties; firstName which equals James, and lastName which equals Smith. You can do this 3 ways:
// 1
var person = {firstName:"Jamie", lastName:"Smith"}

// 2
var person = new Object();
person.firstName = "Jamie";
person.lastName = "Smith";

// 3
function Person() {
  this.firstName = "Jamie";
  this.lastName = "Smith";
}
var person = new Person();
Generate URL
If you are using data to generate a URI, you need to call one of the following functions:
encodeURIComponent which encodes a URI including any special symbols.encodeURI which encodes a URI excluding any special symbols.
decodeURIComponent turns an encoded URI back into its original form, including symbols.decodeURI converts back to original URI, excluding symbols.
try catch (finally)
Standard error handling in JavaScript
try {
  // some code
}
catch(e) {
  // catch errors (e) and handle
}
finally {
  // do something at the end, clean up
}
Class Inheritance
To inherit from a class, a new class must be instantiated using class.prototype. For example:
function User() {
  User.prototype.isAdmin = function() { return false; };
}

function Admin() {
  Admin.prototype = new User();
  Admin.prototype.isAdmin = function() { return true; };
}
You can also overwrite methods of the parent class using prototype.
CSS
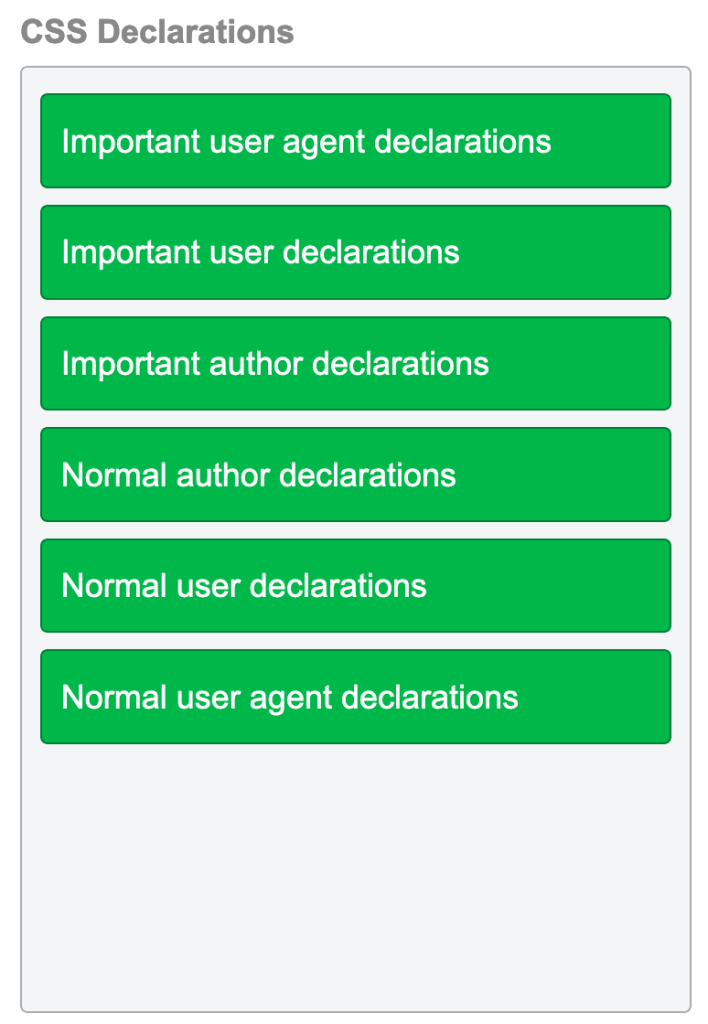
CSS !important tag
Overrides other CSS Style choices.
In case of multiple !important tags, the last declared style will take precedence.
.p {
  color: red !important
}

#thing {
  color: green  // ignored
}
<p id="thing">Would be RED.</p>
(The above is not red as WordPress doesn’t like it when you mess with their CSS!)
Browsers will implement a User’s !important css rules above the authors any others, as these are generally used for accessibility.
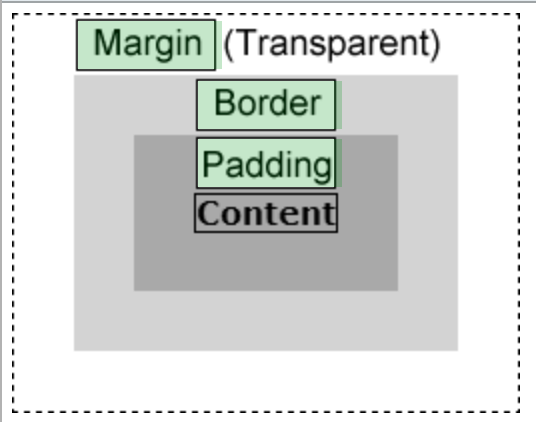
CSS Box Model
The margin is the space between the border of an element and and the elements surrounding elements.
The padding represents the space between the border of an element and the elements content.
CSS Set Colour and Opacity
background-color:#FF0000; opacity:0.2
background: rgba(255,0,0,0.2)
opacity: 0 will make an element fully transparent.
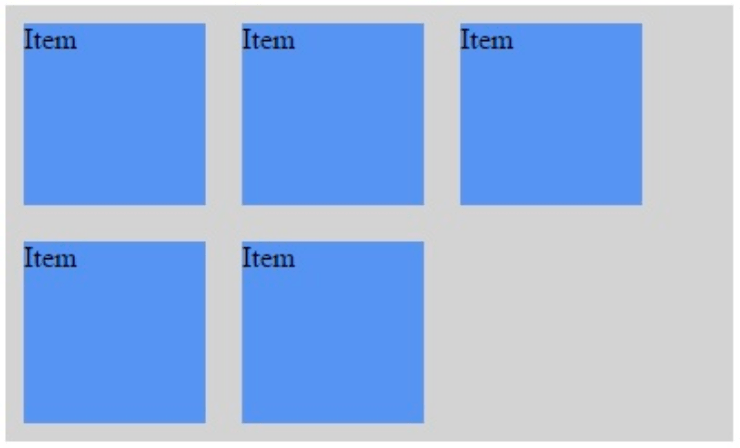
CSS Flexbox
We want to create the below:
The following code already exists:
<style>
.container {
  width: 400px;
  background-color: lightgrey;
}

.item {
  background-color: cornflowerblue;
  width: 100px;
  height: 100px;
  margin: 10px;
}
</style>
</head>
<body>
  <div class="container">
    <div class="item">Item</div>
    <div class="item">Item</div>
    <div class="item">Item</div>
    <div class="item">Item</div>
    <div class="item">Item</div>
  </div>
</body>
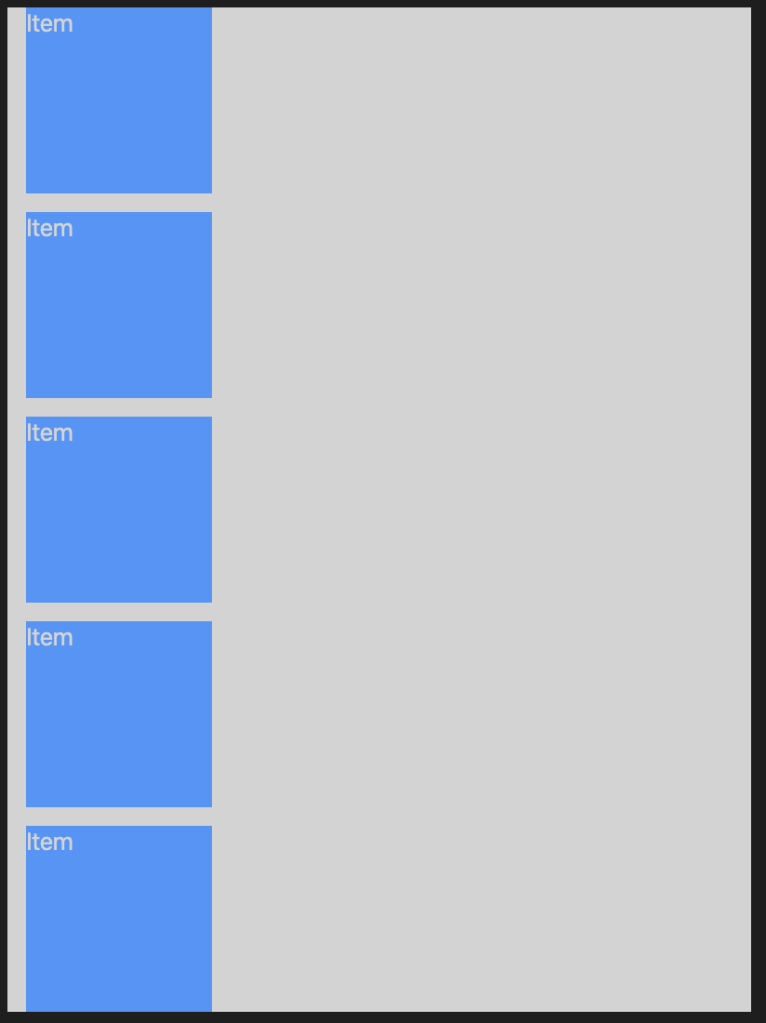
By default this code produces this (ignore the black border, this is from VS Code where I am previewing the HTML page):
To make it look how we want, we need to:
add display:flex to the .container class.
add flex-wrap:wrap to the .container class.
This causes the content to wrap within the container. If the content exceeds the width of the container, it is placed on the next row.
flex-wrap:wrap would do nothing on it’s own. Adding display:flex does this:

Then adding flex-wrap:wrap gives us what we want.
CSS Transition Property
The transition property allows you to add an effect when another property is changed. The first argument is the name of the property to be changed. The second argument is the duration of the transition, in ms.
For example:
<style>
  div { width: 300px; height: 600px; background:lightgrey; transition: width 250ms; }
  div:hover { border: solid 3px blue; width: 400px; }
</style>
If you added the transition to div:hover then it would only apply during the hover state. When you move the mouse away the transition would not apply.
CSS Selector
You need to define a CSS rule to set the background color of all input elements contained in table cells to yellow.
<table>
  <tr>
    <td>
      <input id="name" type="text"/>
    </td>
  </tr>
  <tr>
    <td>
      <input id="age" type="number"/>
    </td>
  </tr>
</table>
To do this you would use:
table td>input { background-color: yellow }
The CSS Selector finds all input elements that are immediate children of td elements, which are in turn descendants of table elements.
You would not use:
table>td>input { background-color: yellow }
As in this case td is not a child of table but a descendant. tr is the child of table.
You would also not use:
table, td, input { background-color: yellow }
As this would select all table, td, and input elements, where we only want input elements that exist inside a table.
Multiple CSS Rules
When multiple CSS rules apply to an element, the most specific selector is used to determine the rule that takes precedence.
<html>
  <head>
    <style>
      section article {background-color: red}
      article {background-color: green}
      .light {background-color: yellow}
      .light article {background-color: lightskyblue}
    </style>
  </head>
  <body>
    <section id="section1" class="light" style="background-color:darkgrey">
      <article>This is a sample article</article>
    </section>
  </body>
</html>
In the above example, the article element would have a lightskyblue background colour. There are 5 rules being applied here, in order of specificity from least to most:
- elements with the class
lightshould have a yellow background. - anything within the
section1div should have a darkgrey background articleelements should have a green background.articleelements that are children ofsectionelements should have a red background.articleelements that are descendants of elements with the classlightshould have a lightskyblue background.
Syntax:text-shadow: h-shadow v-shadow blur-radius color |none|initial|inherit;
h-shadow – Required. The position of the horizontal shadow. Negative values are allowedv-shadow– Required. The position of the vertical shadow. Negative values are allowedblur-radius – Optional. The blur radius. Default value is 0color – Optional. The color of the shadow.none – Default value. No shadowinitial – Sets this property to its default value.inherit – Inherits this property from its parent element.
I was unaware that inches could be used in CSS, so thought it would be good to make a note of the units that CSS accepts:
| Unit | Description |
| cm | centimeters |
| mm | millimeters |
| in | inches (1in = 96px = 2.54cm) |
| px * | pixels (1px = 1/96th of 1in) |
| pt | points (1pt = 1/72 of 1in) |
| pc | picas (1pc = 12 pt) |
@media
The @media rule allows you to target specific CSS rules to specific media types, such as portrait and landscape devices. Example:
@media all and (orientation:landscape) {
  section { width: 400px; height: 200px }
}

@media all and (orientation:portrait) {
  section { width: 200px; height: 400px }
}
media all specifies all media types (any device).and specifies a logical AND.(orientation:landscape) and (orientation:portrait) are property-value pairs which indicates that the rules should only apply to devices matching that property value.
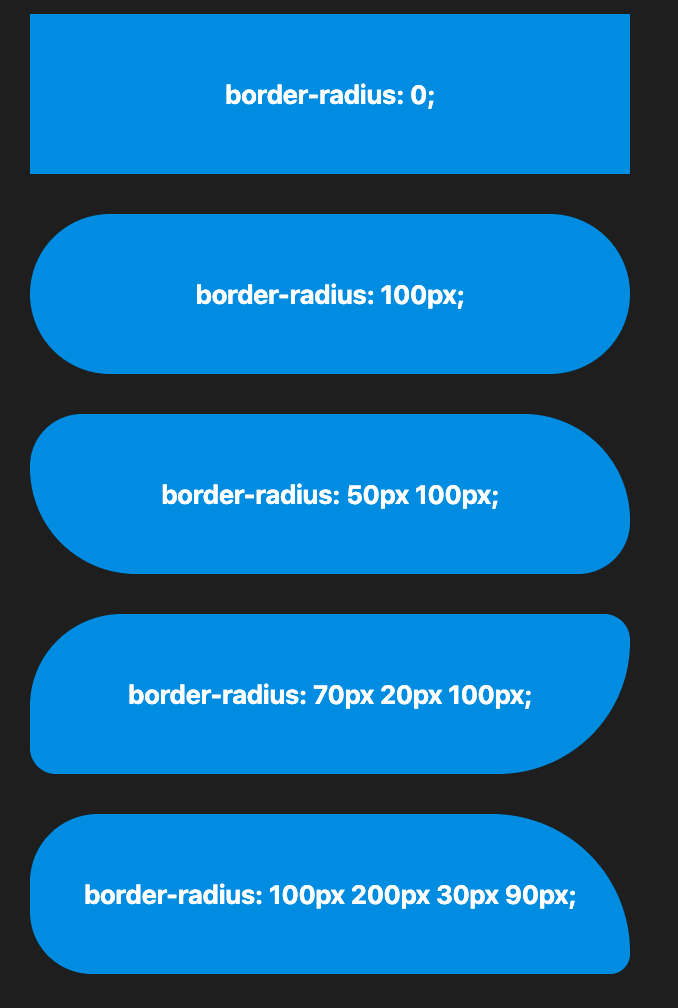
CSS Border Radius
border-radius rounds the corners of an element’s outer border edge.
This property is a shorthand to set the four properties border-top-left-radius, border-top-right-radius, border-bottom-right-radius, and border-bottom-left-radius.
Syntaxborder-radius: 10px; – Radius set for all 4 cornersborder-radius: 10px 5px; – top-left and bottom-right | top-right and bottom-leftborder-radius: 2px 4px 2px; – top-left | top-right and bottom-left | bottom-rightborder-radius: 1px 0 3px 4px; – top-left | top-right | bottom-right | bottom-left
Useful Colour Hex Codes
#FFFFFF – White#000000 – Black#666666 – Grey#FF0000 – Red#0000FF – Blue#00FF00 – Green#FFFF00 – Yellow
@font-face
@font-face lets you use custom fonts in your websites.
Rotate
To rotate an object with CSS, we use tranform: rotate().
rotate(90deg) is equivalent to rotateZ(90deg). This would rotate the object on the Z axis by 90 degrees.
Other options for rotating are:
rotateX(a) – rotates on the X axis by a degreesrotateY(a) – rotates on the Y axis by a degreesrotate3d(X, Y, Z, a) – rotates on all axis by a degrees. The values for X, Y and Z here are integers which represent how much a will effect them. For example rotate3d(1, 1, 1, 45deg) would rotate each axis by 45 degrees. rotate3d(1, 0.5, 2, 90deg) would rotate 90 degrees on the X axis, 45 degrees on the Y axis, and 180 degrees on the Z axis.
At first I found it hard to visualise the way each of these was going to rotate objects on the screen, but I found the below links very helpful as they show it well:rotateZ()rotateX()rotateY()rotate3d()
CSS Link Colours
Example:

We want the A Link text to also be green. There’s two ways to do this:
add style="color: green;" to the <a> element
add style="color: inherit;" to the <a> element. This will allow it to inherit the colour from its parent, <p>.
Opacity

I am currently studying for the 70-480 exam and have found your notes extremely helpful. They seem to perfectly answer a lot of the little questions and niggles I have. Thank you for sharing.
LikeLiked by 1 person