
Learning About jQuery, AJAX and Bootstrap
As I mentioned yesterday, we used a few things for the first time while building our Thermostat.
- <br> – the <br> html tag adds a line break after the line you put it. Putting in multiple tags adds multiple line breaks. Useful for spacing things out on a page.
- Interface – For our thermostat we had to create an interface. Basically this was just an html page with some buttons on that served as the controller for our program. Here is the interface code at the end of the project with some style in:
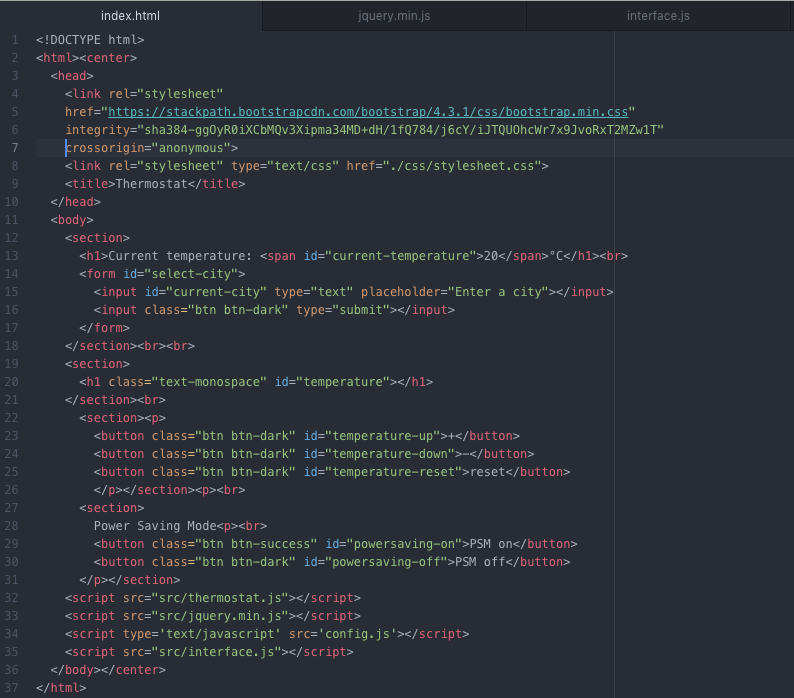
In order for the buttons to actually do anything we had to create another file with some jQuery commands on.
jQuery
Like I said yesterday, jQuery is an event driven JavaScript library that makes things easier, wrapping functions up into simpler code. jQuery basically lets our webpages be interactive. We could do this without jQuery just using JavaScript, but it takes much more code. There are some basic jQuery commands to learn at the beginning:
$(document).ready(function() { })
This utility function translates to “only execute the function when the document is ready”, i.e. when the DOM is loaded. This is a good idea because it’s difficult (but not impossible!) to attach an event listener to something that isn’t there. Forgetting to wrap jQuery code in this is a common source of bugs.
Side note on what the DOM actually is from Mozilla –
A Web page is a document. This document can be either displayed in the browser window or as the HTML source. But it is the same document in both cases. The Document Object Model (DOM) represents that same document so it can be manipulated. The DOM is an object-oriented representation of the web page, which can be modified with a scripting language such as JavaScript.
jQuery selector
The jQuery selector generally works like this:
$('element')
where element is a CSS selector, or a tag name. In my interface code above you can see my tags are identified with id= such as id="temperature".
Event listeners
In longhand, these usually look like
$('element').on('event', function() { })
where event is an action you would like to listen for on the page. Popular events include clicks, scrolls, typing and generally any kind of page interaction. The most popular ones generally have convenient shortcut functions, so you can write $('element').click(function() { }), for example.
Callbacks
Simply put, a callback is a function that is to be executed after another function has finished executing — hence the name ‘call back’.
In jQuery the callback is the anonymous function passed as last argument to the event handler:
$('#some-heading').click(function() {
  // this function is the callback!
})
In this case, the callback is the function passed to the click function, that executes at some point in the future. The plain English translation would be “when there is a click on the element with the ID some-heading, run the function”. Here is an example in my code:
$('#temperature-up').click(function() {
    thermostat.increase();
    updateTemperature();
  });
This runs my thermostat increase function which increases the temperature by one, and also the update temperature function which prints the temperature to the html page.
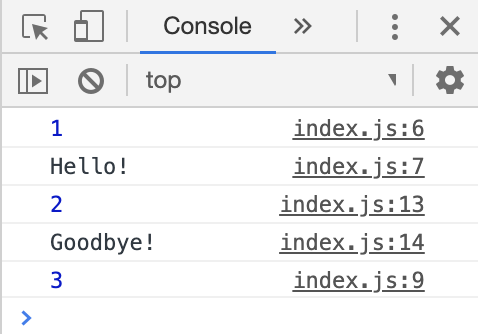
Here is a clearer example of a callback in JavaScript, you can see that I have numbered a console.log() for each part to show in what order they are called to the console:
function greet(callback) {
  console.log(1)
  console.log('Hello!');
  callback();
  console.log(3)
}

greet(function() {
  console.log(2)
  console.log('Goodbye!')
});
And that prints in the console as:
AJAX
In our interface JS code, we have a $get function:
$.get(url + token + units, function(data) {
   $('#current-temperature').text(Math.round((data.main.temp)*10)/10);
  })
$get is shorthand for $.ajax(), which itself is a jQuery wrapper for JavaScripts built in XMLHttp library. AJAX stands for Asynchronous JavaScript and XML, as it is the two working together, although JSON is used more than XML now.
Once Ajax requests are triggered by JavaScript code; your code sends an XMLHttpRequest request to a URL (which can be any kind of data not just XML despite the name), and when it receives a response, a callback function can be triggered to handle the response. Because the request is asynchronous, the rest of your code continues to execute while the request is being processed, so it’s imperative that a callback be used to handle the response.
We used this to call to an openweathermap API to request weather data for a city entered into the search bar.
API’s
Here is the complete code for that function:
  function displayWeather(city) {
  var url = 'http://api.openweathermap.org/data/2.5/weather?q=' + city;
  var token = '&appid=' + weatherApi;
  var units = '&units=metric';
  $.get(url + token + units, function(data) {
   $('#current-temperature').text(Math.round((data.main.temp)*10)/10);
  })
}
As you can see in the code, I have a variable called weatherAPI, which holds my API key. I did this so that when I uploaded my code to GitHub, my API key wasn’t visible publicly. This was fairly straightforward to achieve and will be useful going forward, so here is how I did it, thanks to this guide!
Hiding My API Key
First I created a file called config.js in the root directory of my project. In here I defined a variable and stored my key in it:
var config = {
  WEATHER_API_KEY : '123456',
  ANOTHER_API : '56789',
}
As you can see you can do as many keys as you want in there. That is the only code needed in this file.
In my html interface file, I needed to add a script to link to this page so the key could be accessed:
<script type='text/javascript' src='config.js'></script>
This should be placed below the jQuery script but above the script for the interface.
In my interface.js file I defined the key as a variable at the top, under where I defined my thermostat class:
$(document).ready(function() {
  var thermostat = new Thermostat();
  var weatherApi = config.WEATHER_API_KEY;
This meant I could use weatherAPI in my code instead of the actual API Key. Finally I created a .gitignore file and added config.js to it, so my git commit would ignore it.
Bootstrap
Bootstrap is another new thing I used yesterday. Bootstrap is an open source toolkit for developing with HTML, CSS, and JS, and allows you to add style easily by pulling from an already created library of styles. To get it working, all you have to is add the following to your <head> tag:
<link rel="stylesheet" href="https://stackpath.bootstrapcdn.com/bootstrap/4.3.1/css/bootstrap.min.css" integrity="sha384-ggOyR0iXCbMQv3Xipma34MD+dH/1fQ784/j6cY/iJTQUOhcWr7x9JvoRxT2MZw1T" crossorigin="anonymous">
Once you have done this, you can search the Bootstrap website for whatever you want. For example, I used it to style my buttons, searching for buttons gave me the below results:
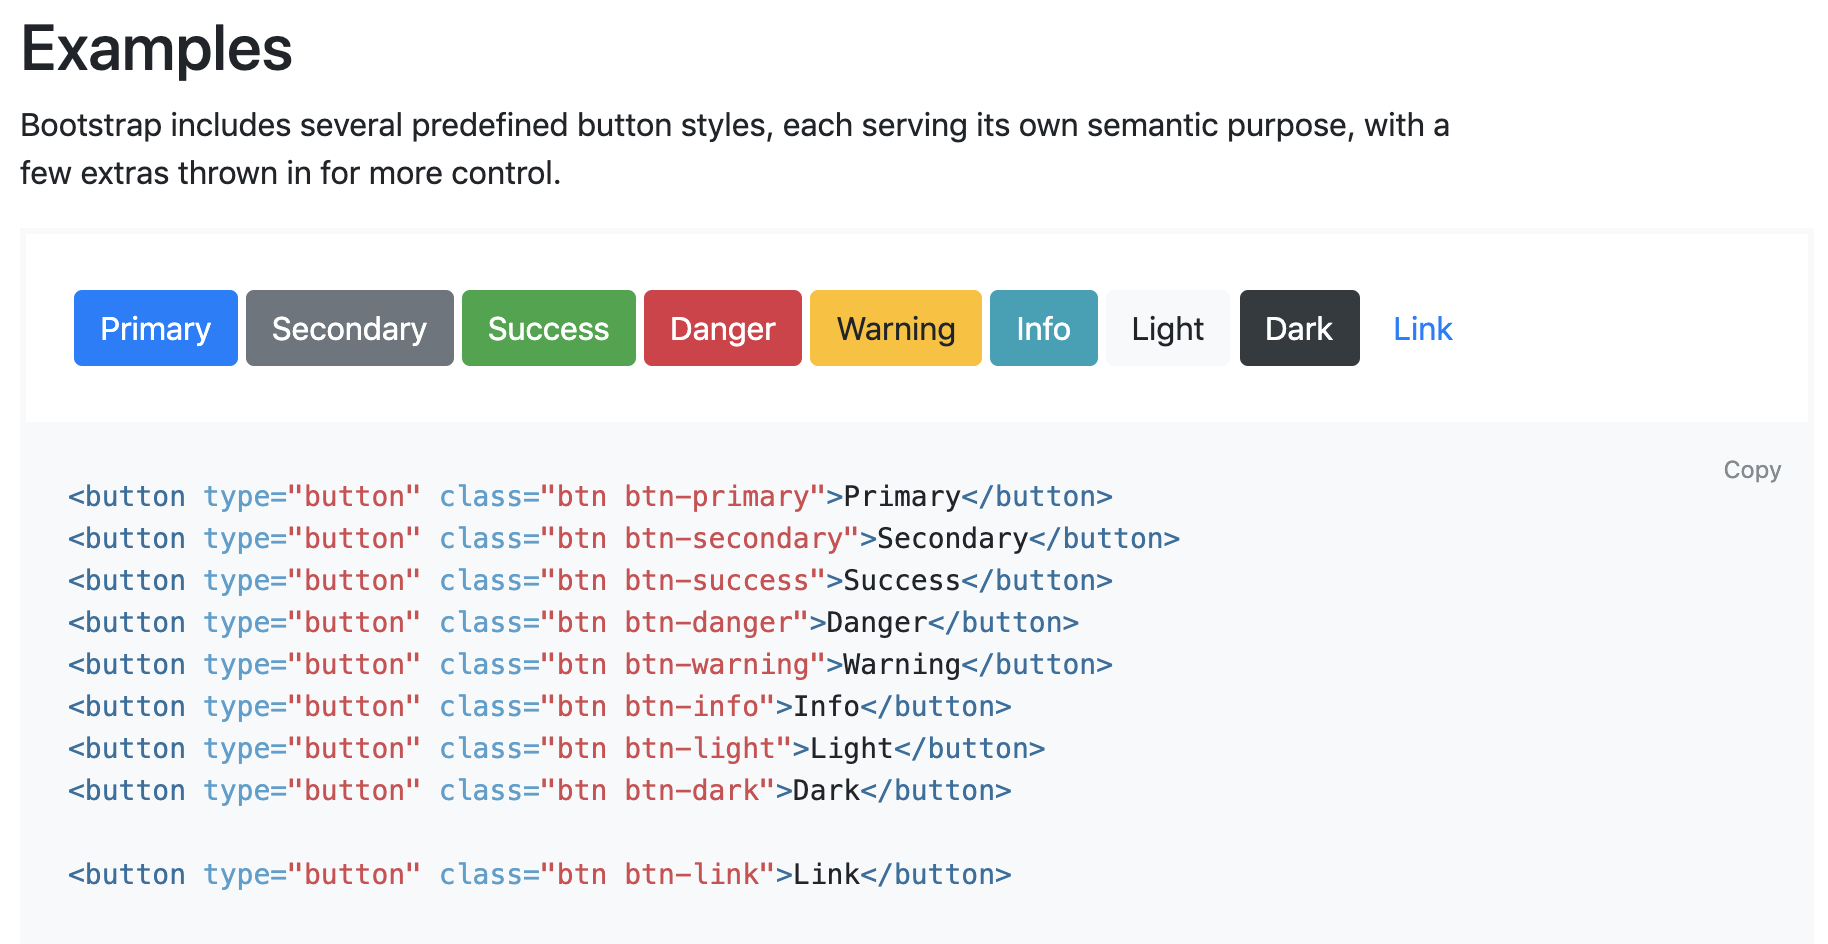
So I added the btn btn-dark class to my button objects, which made them look like they do above!
I also combined this with some jQuery in my interface.js file for the PSM On and Off buttons. I wanted to make the On button Green and the Off button Red, but only when they were active. Here is how I achieved this in jQuery:
  $('#powersaving-on').click(function() {
    thermostat.powerSavingModeOn();
    $(this).removeClass('btn btn-dark')
    $(this).addClass('btn btn-success')
    $('#powersaving-off').removeClass('btn btn-danger')
    $('#powersaving-off').addClass('btn btn-dark')
    updateTemperature();
  })

  $('#powersaving-off').click(function() {
    thermostat.powerSavingModeOff();
    $(this).removeClass('btn btn-dark')
    $(this).addClass('btn btn-danger')
    $('#powersaving-on').removeClass('btn btn-success')
    $('#powersaving-on').addClass('btn btn-dark')
    updateTemperature();
  })
The jQuery commands can add and remove classes on the objects, so by adding the class I want to the button on click, and removing the class from the other button, I can create the effect I wanted:
Bootstrap made the styling a million times easier, I wish I had known about it when I was doing Chitter!
Thermostat
Today I tackled the last step of the Thermostat challenge, which was to create a server that stored the Temperature and City data on it, so if you reloaded the page they would persist. There was no walkthrough for this so it was all down to us to research and figure it out ourselves. The jQuery code for GET and POST to a server were not too bad, we had already used $.get in our API call to the weather server, so it was similar to that. I did add some guard clauses into mine though, here they are:
  function serverTemperature() {
    $.ajax({url:"http:localhost:9292/city",
            type: "HEAD",
            timeout:1000,
            statusCode: {
              200: function() {
                $.get("http:localhost:9292/temperature", function(data) {
               if(data !== ""){
                 thermostat._temperature = data;
               }
               updateTemperature();
             });
           },
           0: function() {
             updateTemperature();
           }
         }
       });
     }

  function serverCity() {
    $.ajax({url:"http:localhost:9292/city",
            type: "HEAD",
            timeout:1000,
            statusCode: {
              200: function() {
                $.get("http:localhost:9292/city", function(data) {
                 if(data !== ""){
                   var city = data
                   console.log(city)
                   displayWeather(city);
                   $('#city-name').text(city);
                 } else {
                   displayWeather('London');
                 }
               })
             },
              0: function() {
                displayWeather('London');
              }
            }
            });
          }
Basically it first checks the server is there, if it gets the error code 0, it defaults back to the local info. Then it checks whether there is actually any information stored on the server, again if not it defaults back. If it is there, and there is information, it uses those to set the variables on the web app.
The $.post requests were new, but were quite similarly written:
$.post( "http:localhost:9292/city", { city: city });
  })

$.post( "http:localhost:9292/temperature", { temperature: thermostat._temperature });
}
As there were functions already for updating both, I just added the post requests on at the end of those to post the information to my server. If the server isn’t there, it doesn’t really matter, the information just doesn’t get posted.
Annoyingly the hardest part about doing this should have been the easiest! In my server app.rb file, I was receiving the POST request information, but I couldn’t get it to save to a session! If anyone can figure out what was going wrong in the below please let me know!
require 'sinatra/base'

class Thermostat < Sinatra::Base
  enable :sessions
  set :session_secret, 'super secret'

  post '/temperature' do
    headers 'Access-Control-Allow-Origin' => '*'

    session[:temperature] = params[:temperature]
    redirect '/temperature'
  end

  get '/temperature' do
    headers 'Access-Control-Allow-Origin' => '*'
    session[:temperature]
  end
end
The session[:temperature] variable was returning nil in my get '/temperature' ditty and nothing I did would fix it. A coach also looked at it and couldn’t figure out why, so eventually we used a global variable instead! This fixed it and now my Thermostat persists after refreshing the page (as long as the local server is running!).
Todays song of the day is: