
More JavaScript – Sheep, Airports, Thermostat
Strict
This morning I started looking at re-creating the Airport Challenge which we did a few weeks ago in JavaScript. The start of the walkthrough tells you to add 'use strict'; at the top of the spec file, but doesn’t really talk about what that means, so I found out.
The purpose of "use strict"; is to indicate that the code should be executed in “strict mode”. With strict mode, you can not, for example, use undeclared variables. Here is an example of that. When you are not in strict mode, you could do the below:

However adding strict mode would then cause this to return an error:
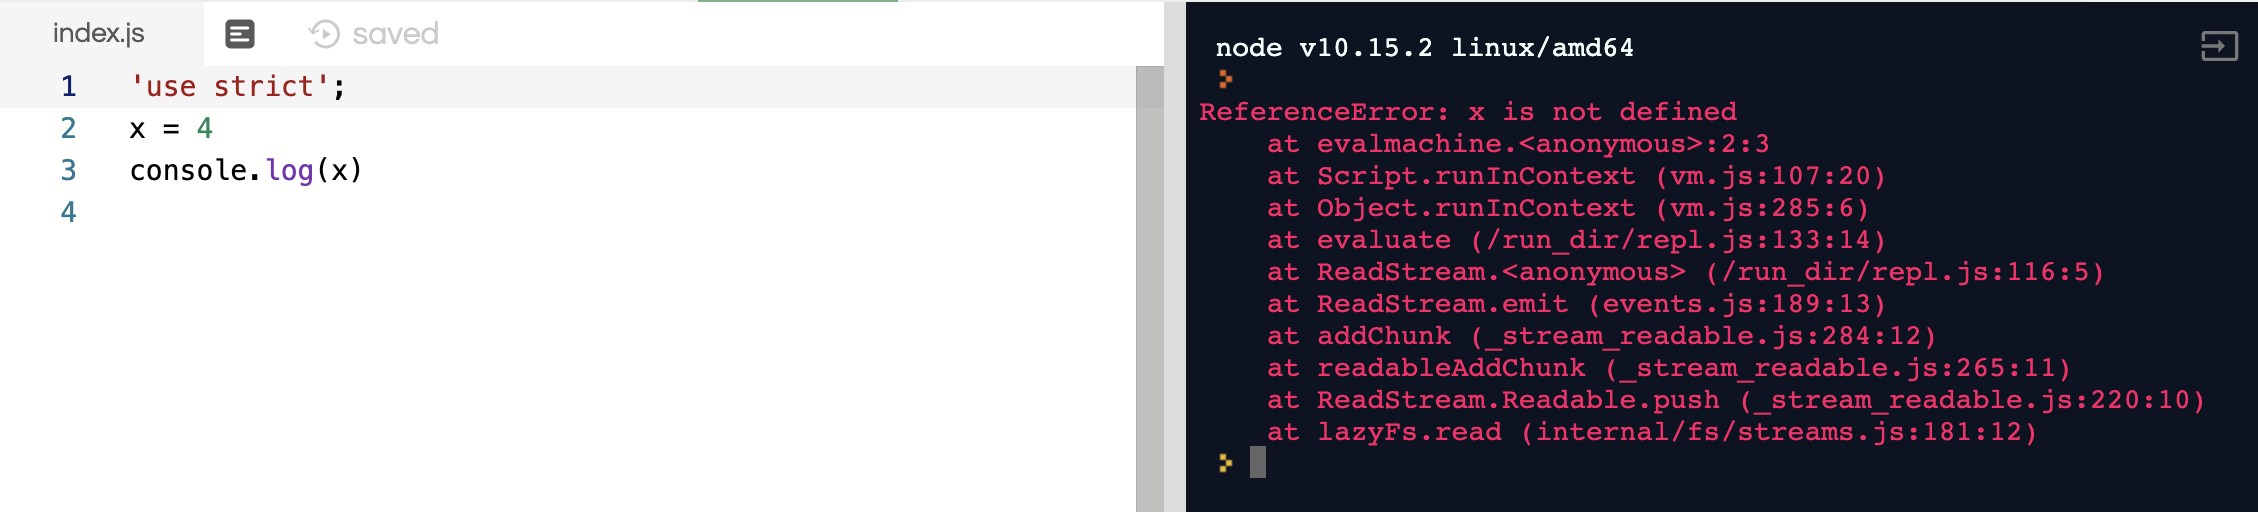
So we would need to define x as a variable:

Spy Objects
A spy object in JavaScript is the same as a double in Ruby. It allows you to recreate another class that a test may be dependant on, so that you are only testing the behaviour of one class, and not both. You can create spy objects, or spy on an object to double a certain method, like below:
weather = jasmine.createSpyObj('weather', ['isStormy']);

spyOn(airport,'isStormy').and.returnValue(true);
Constructor Prototype Pattern
This morning we had a workshop on the constructor prototype pattern, which is the method we are using to write JS currently. I talked about how this worked yesterday but we got a bit more information today. Mainly we focussed on Prototypical Inheritance. When a class instance is created in JS, it is created with a prototype, which outlines all the methods within the class. This prototype is linked to every instance of that class, so all of them have the same methods. You can set methods directly on an instance as well if you just want that one specific instance to be able to use it. Here is an example:
Here is my code for a CountModel object:
function CountModel() {
  this._count = 0;
};

CountModel.prototype.count = function() {
  return this._count;
};

CountModel.prototype.set = function(count) {
  this._count = count;
};

var countModel = new CountModel();
countModel.set(5);
console.log("count is", countModel.count());
The count model object has had two methods defined in its prototype, set and count. set sets the number and count returns it. Now we can create two instances of this object:
var countModel = new CountModel();
countModel.set(5);
console.log("count is", countModel.count());

var countModel2 = new CountModel();
countModel2.set = function() {
  return "hello";
};
countModel2.set(5);
console.log("count is", countModel2.count());
And here is the output in the console, the top being countMethod, and the second being countMethod2:
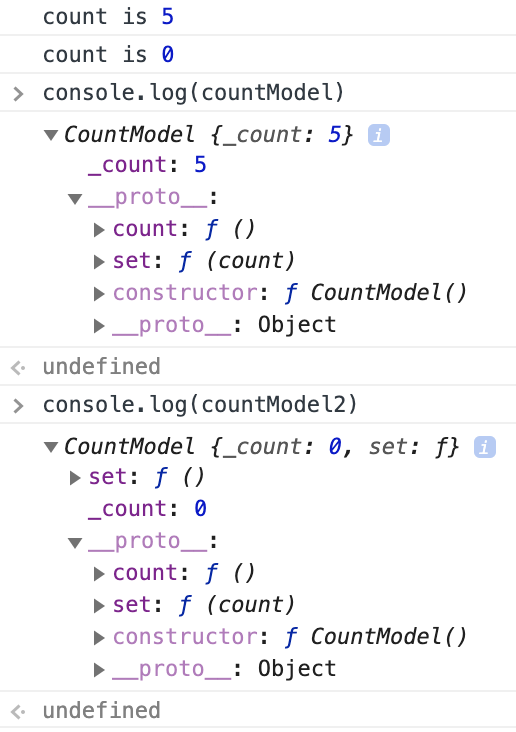
The reason they are different is in our countModel2 instance we are defining a method for set (lines 6-8). The way prototypical inheritance works, it looks at the instance first to see if any methods are set there, then back to the prototype. As set is defined on both, it takes the instance method first and executes that. You can see in the image above that the two instances have the same __proto__ information, but countModel2 has an extra set method above it. Because of this it never calls the original set method, so the count method doesn’t work either, hence it returns 0.
Sheep
We were also given the challenge to create a small JavaScript program based on the below user stories:
As a shepherd
So my sheep can be safe
I want to have a pen they can go into

As a shepherd
So my sheep can be friends
I want them to be able to say their names

As a shepherd
So I can know all my sheep are home
I want to get a list of all the names of the sheep in the pen
Using our experience of JavaScript from the challenges yesterday and the workshop this morning we gave it a go. After a bit of trial and error we got it all working. Here is our code:
Pen
// Code

function Pen(){
  this._sheep = [];
}

Pen.prototype.sheep = function(){
  return this._sheep
};

Pen.prototype.enter = function(sheep){
  this._sheep.push(sheep);
};

Pen.prototype.listSheep = function(){
  return this._sheep.map(function(sheep) {
    return sheep.name()
  });
};


// Tests

describe('Pen', function(){
  var pen;
  var sheep;
  var sheep1;
  var sheep2;

  beforeEach(function(){
    pen = new Pen();
    sheep = new Sheep();
    sheep1 = new Sheep("Josh");
    sheep2 = new Sheep("Deanna");
  });

  describe("sheep can enter the pen", function(){
    it('has no sheep by default', function() {
      expect(pen.sheep()).toEqual([]);
    });

    it('sheep can go in the pen', function(){
      pen.enter(sheep);
      expect(pen.sheep()).toEqual([sheep])
    });
  });

  describe("lists sheep", function(){
    it('lists sheep in the pen by name', function(){
      pen.enter(sheep1);
      pen.enter(sheep2);
      expect(pen.listSheep()).toEqual(["Josh", "Deanna"])
    });
  });
});
Sheep
// Code

function Sheep(name){
  this._name = name
}

Sheep.prototype.name = function(){
  return this._name
};


// Tests

describe('Sheep', function(){
  var sheep;

  beforeEach(function(){
    sheep = new Sheep("Josh")
  });

  describe('sheep can have names',function(){
    it('knows its name', function(){
      expect(sheep.name()).toEqual("Josh")
    });
  });
});
Here are our tests and showing it working in the console:

Thermostat
In the afternoon we worked on a thermostat app using JavaScript. Here are the features we needed to implement:
- Thermostat starts at 20 degrees
- You can increase the temperature with an up function
- You can decrease the temperature with a down function
- The minimum temperature is 10 degrees
- If power saving mode is on, the maximum temperature is 25 degrees
- If power saving mode is off, the maximum temperature is 32 degrees
- Power saving mode is on by default
- You can reset the temperature to 20 with a reset function
- You can ask about the thermostat’s current energy usage: < 18 is
low-usage, < 25 ismedium-usage, anything else ishigh-usage. - (In the challenges where we add an interface, low-usage will be indicated with green, medium-usage indicated with black, high-usage indicated with red.)
Writing the tests and code for this was actually surprisingly easy. After playing around with the Sheep challenge earlier, writing these functions was quite straight forward, so I guess I am learning already! Once we had this working, we had to implement it into a HTML document, which was something completely new, so we pretty much followed the walkthrough exactly.
We got to use something new though, jQuery. jQuery is a lightweight, “write less, do more”, JavaScript library. The purpose of jQuery is to make it much easier to use JavaScript on your website. jQuery takes a lot of common tasks that require many lines of JavaScript code to accomplish, and wraps them into methods that you can call with a single line of code.
Along with jQuery we use something called Ajax (Asynchronous JavaScript and XML). Using Ajax, data can be passed between the browser and the server, using the XMLHttpRequest API, without having to reload the web page.
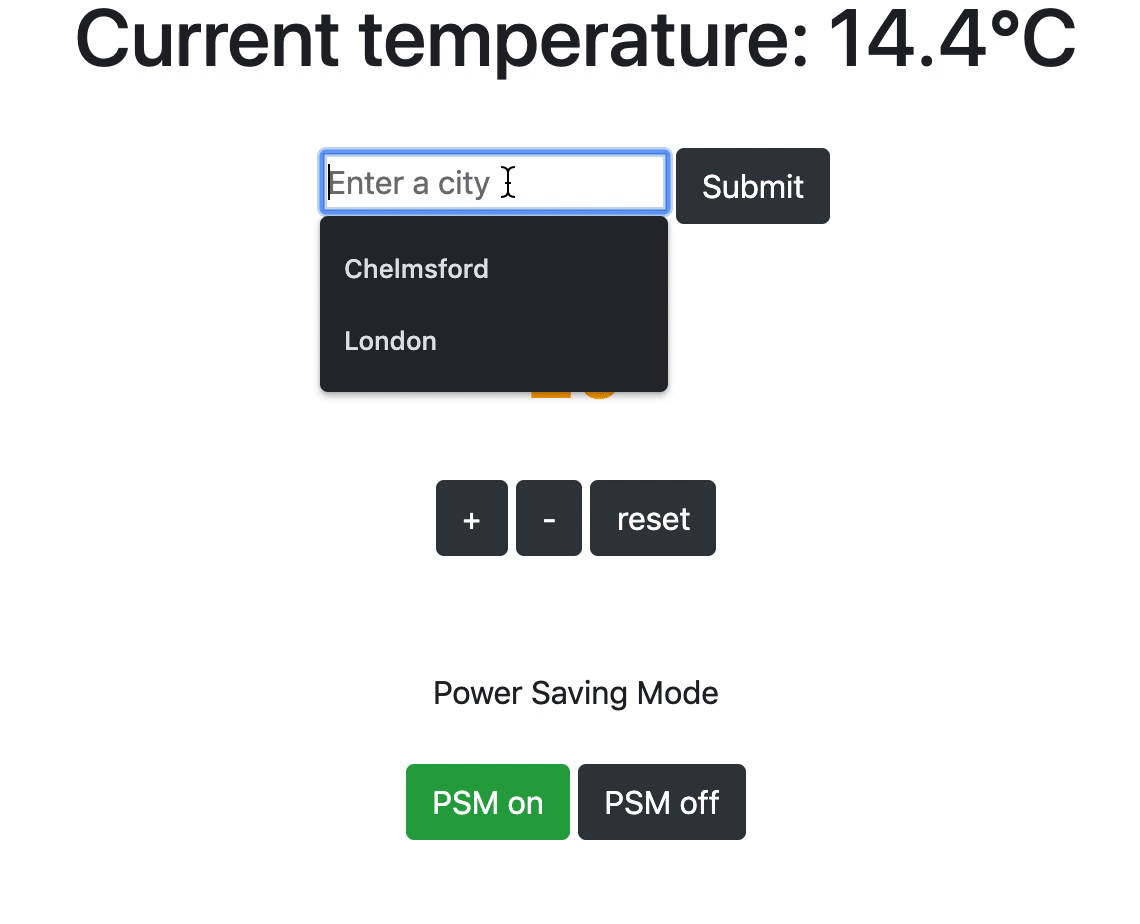
With a bit of code and bootstrapping, we were able to turn our JS code into a working web app:
I will probably go into more detail on Bootstrap, Ajax and jQuery another time, this blog post is already way too long!
Todays song of the day:

